A long overdue catch up: 2017 so far…

Hello, Friends!

2017 has been flying by so I thought it about time to take stock of what’s been happening this year so far.

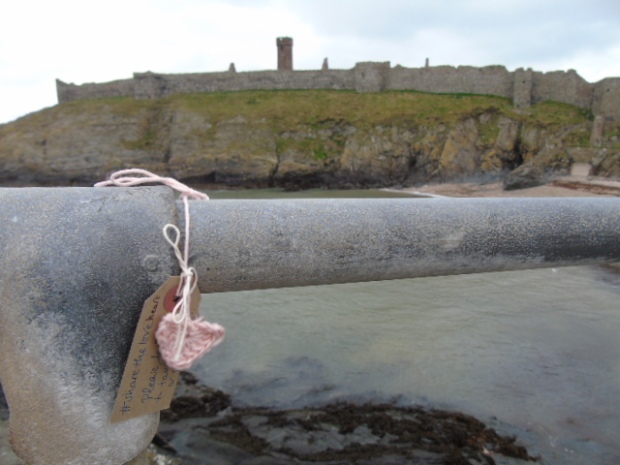
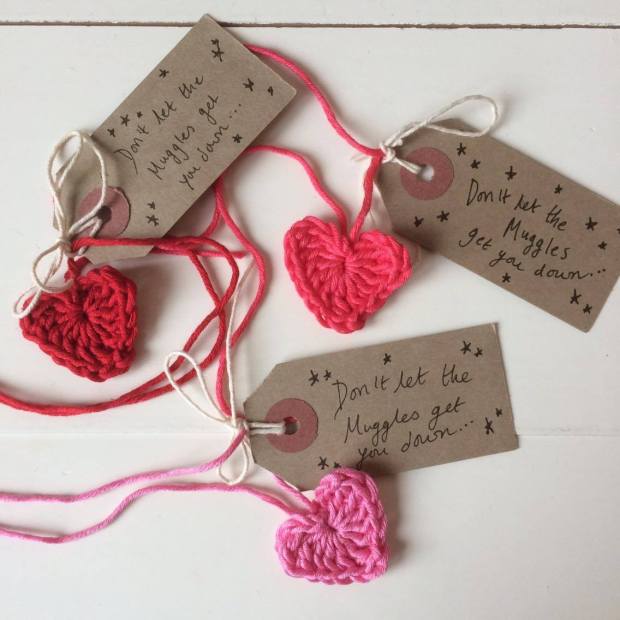
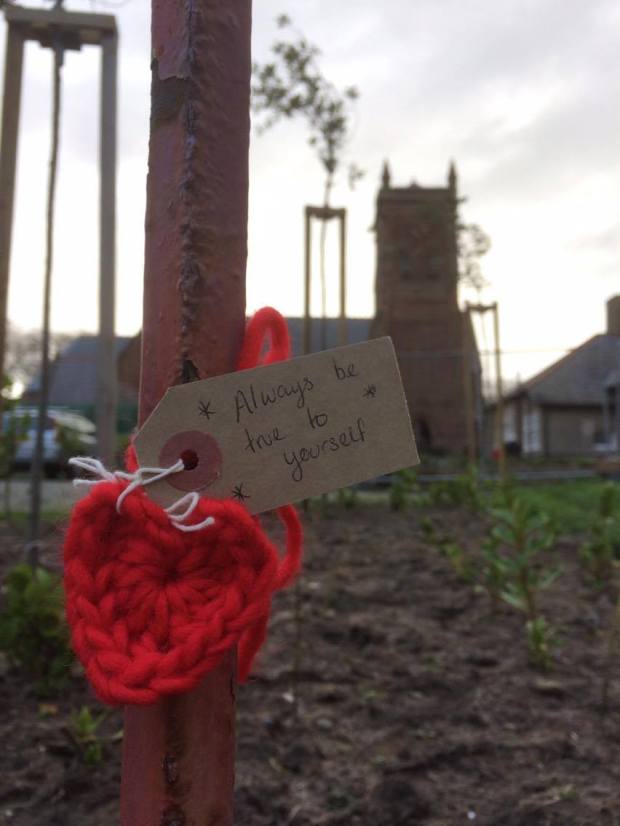
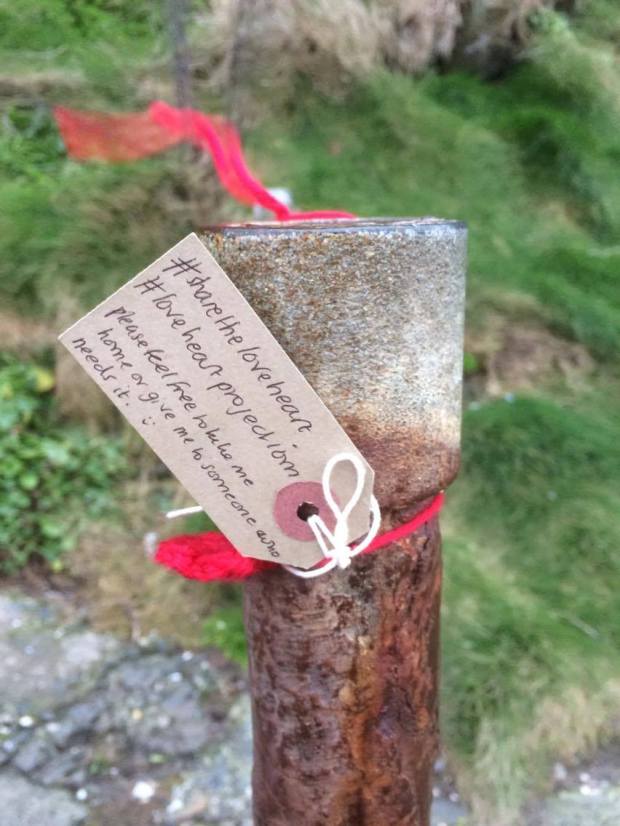
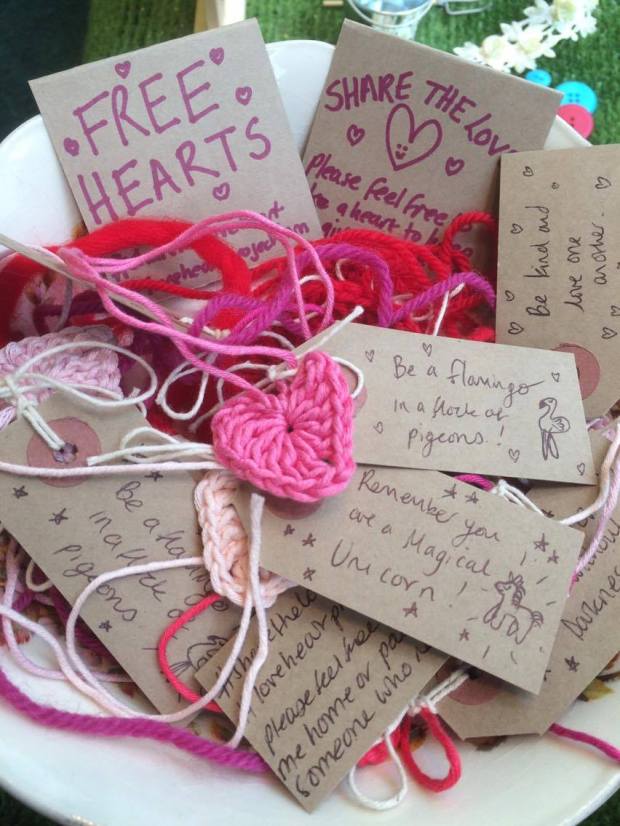
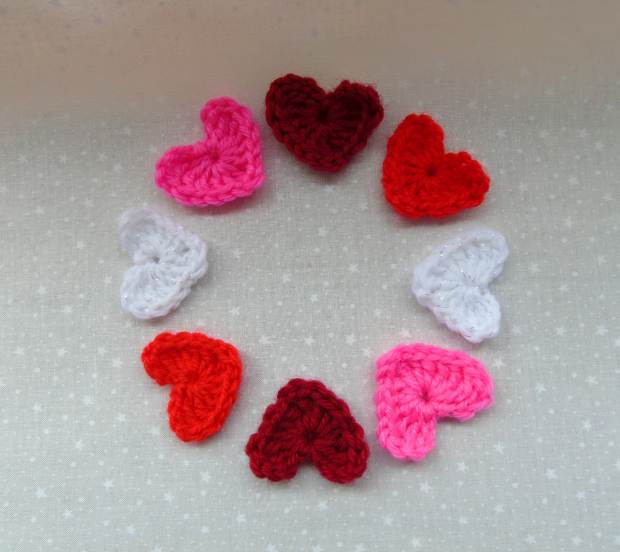
Following the Share the Love Heart project back in February (read about it here) the year got off to a fabulous start with so much interest in crochet workshops! I’ve had the pleasure of meeting and teaching so many people how to crochet this year, and it’s been lovely to see so many familiar faces coming back to try their skills at more advanced Amigurumi projects like these really cute cacti below!

Cacti samples

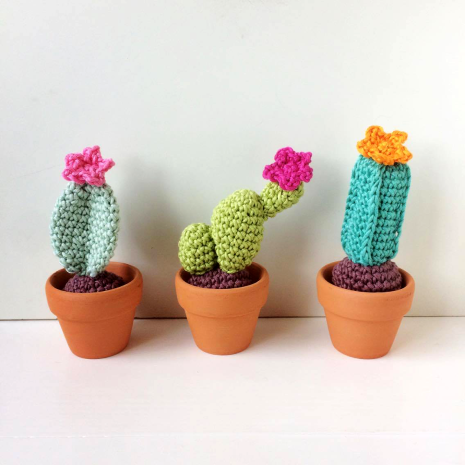
Cute little crochet cacti for my introduction to amigurumi workshops earlier this year.

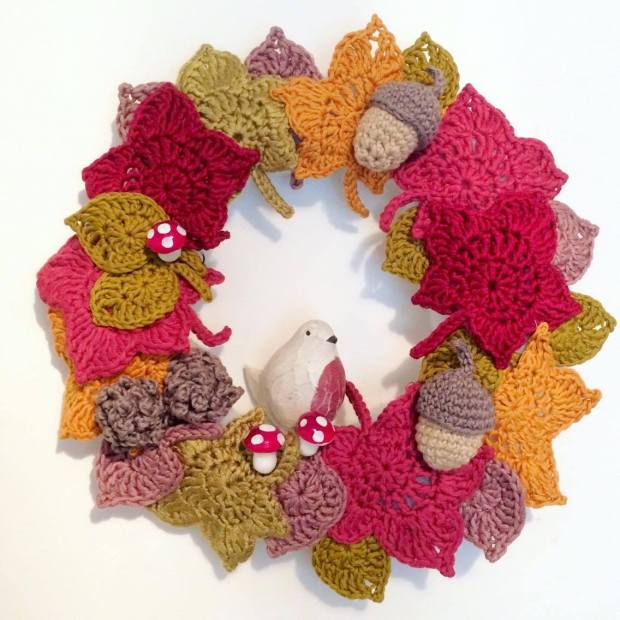
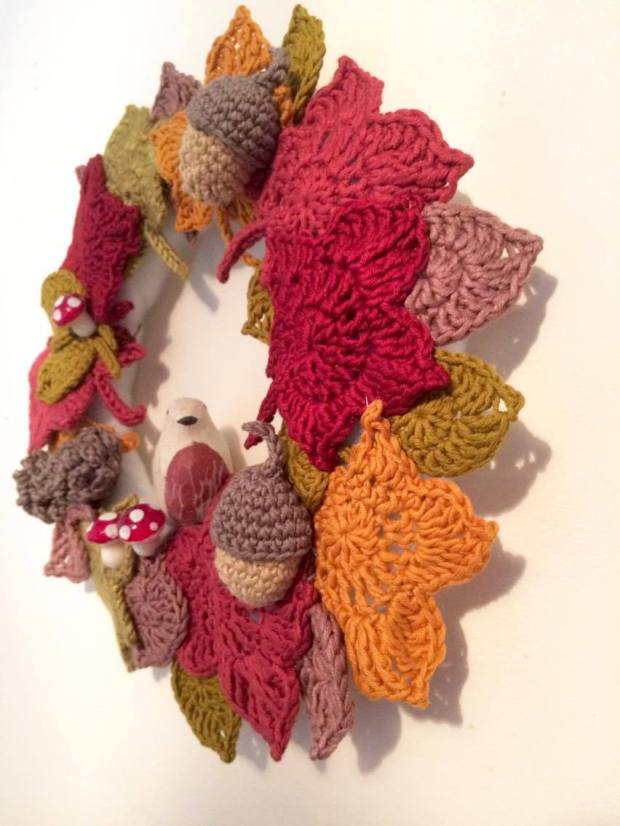
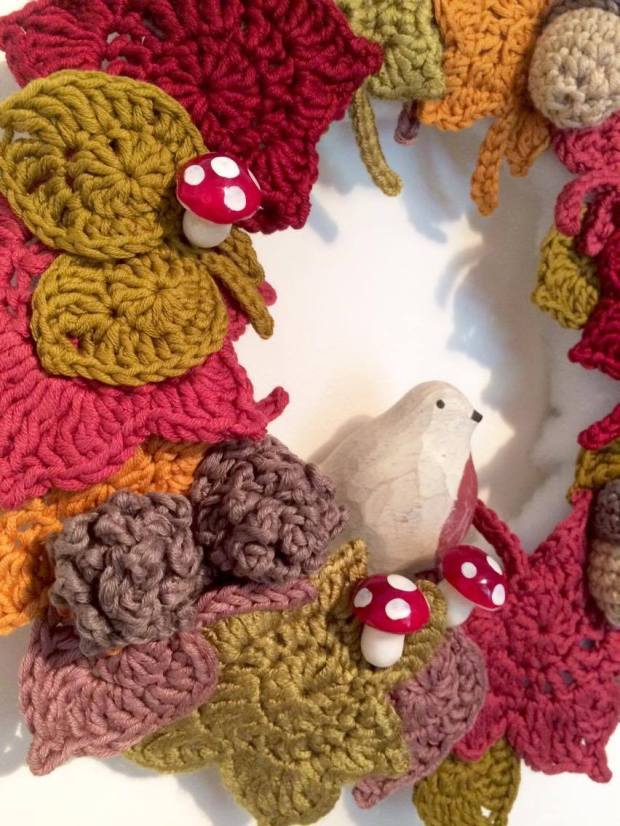
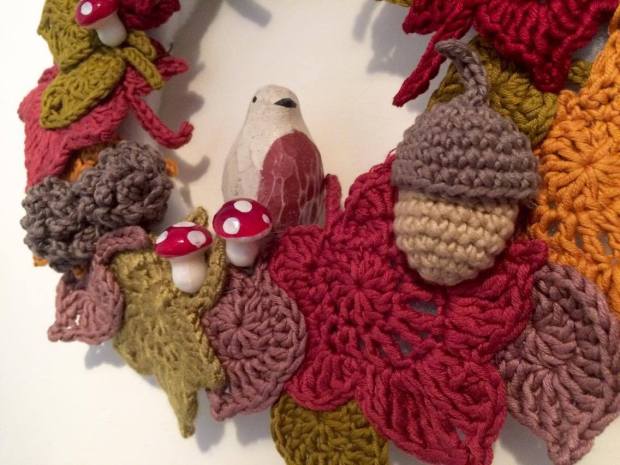
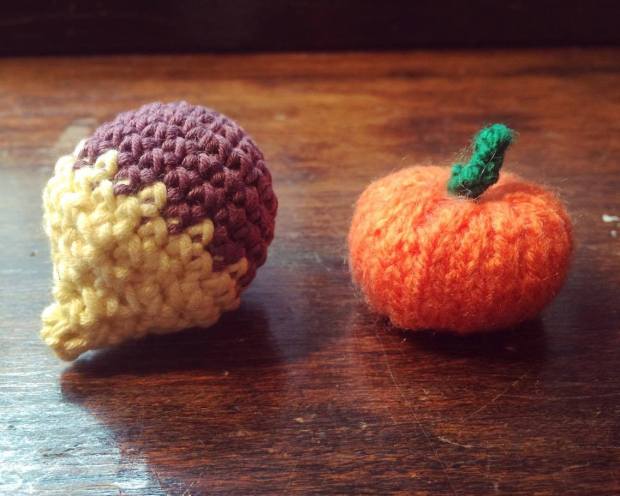
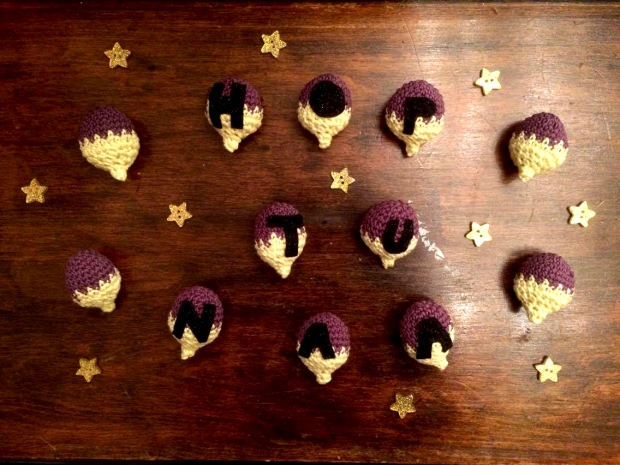
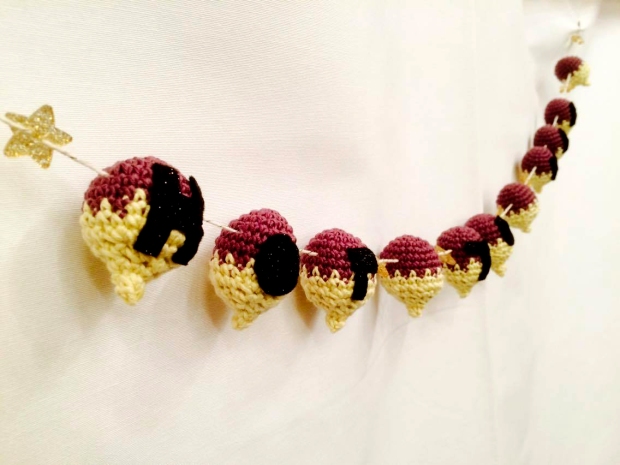
Now that it’s autumn, I’ve had another surge of interest and it’s fantastic! My projects are always themed with the seasons and I find this time of year the most inspiring. Two of my projects take particular inspiration from Hop Tu Naa, a tradition on the Isle of Man that shares similar roots with Halloween. My Manx moots (turnips) and Jinny the Witch Hats have gone down a treat so far so I’m really excited to hold those workshops in October! If you’d like to read more about moots and Hop Tu Naa I wrote a blog post all about them last year.

Autumn Workshops 2017

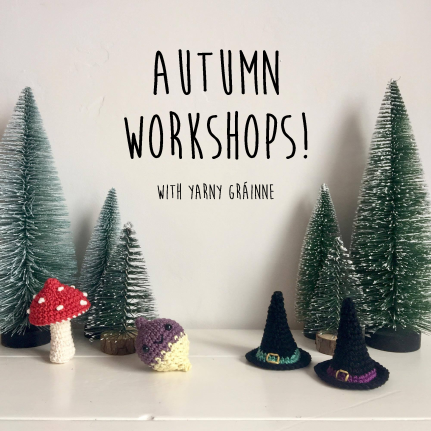
Some of the workshop projects I’ll be teaching over Autumn (right to left): Toadstools, Moots (turnips) and Jinny the Witch Hats

One of the biggest goals I achieved this year was to finally set up an Etsy Shop! It took a lot longer than I thought it would and a lot more bravery to finally click publish but by July I did it (6 months after initially saying I would go for it isn’t too bad going, right?)! Once it was done I’d felt like a huge weight had been lifted. And despite not having a huge amount of stock there, I am just so pleased that I managed to get it set up and have it as something to work on and improve as I go. I think the lesson I learnt here was not to strive for perfection because otherwise you never feel ready, instead just go for it. Even if it needs a little tweaking now and again, it’s better to have something set up that you can work on rather than putting it off time after time all because it’s not your idea of ‘perfect’.


If you’d like to have a little look at my Etsy page you can here.

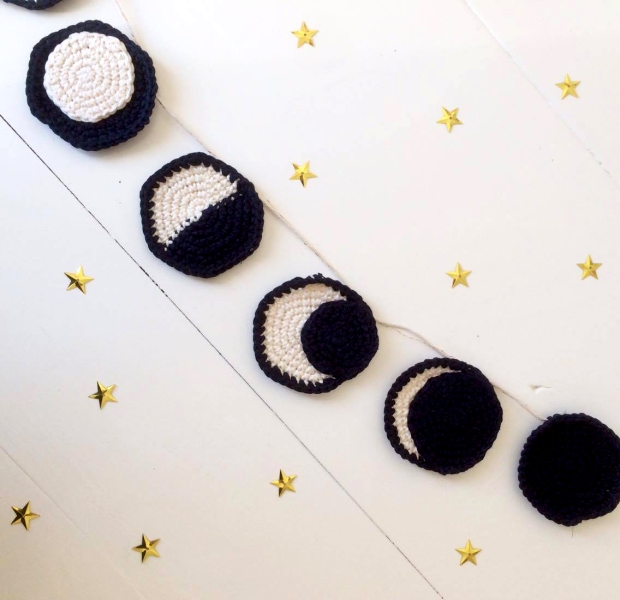
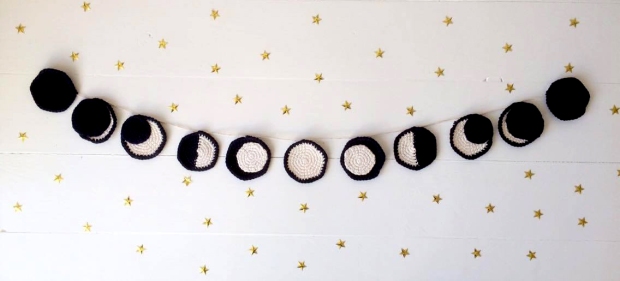
Another amazing thing that happened this year was that one of my patterns got published in a magazine! I revised my Moon Garland from a previous blog post and the new 2.0 version is in issue 19 of Crochet Now! I’m so proud of this achievement and so pleased with the way the project was styled and featured in the magazine. My Phases of the Moon Garland was inspired by my love of all things celestial. I am very lucky to live where I do because the island has the most concentrated Dark Skies sites in the British Isles, which is perfect for star gazing! I love to be able to just step outside my door on a clear evening and look up.


If you’d like to get hold of a print or digital copy you can find out how to here.

Thank you so much for taking the time to catch up on what’s been going on this year. Hopefully the rest of 2017 will be just as exciting! If you’d like more regular updates pop over to my Facebook and Instagram pages.

For now though, lots of love and happy Autumn!

Gráinne x

(rhymes with narnia)

Share the Love Heart Project so far…

Hello, lovely people!

I’m going off Island tomorrow, and though there are still a few days left of this project, I wanted make a record of the amazing effort made by so many people making or finding hearts so far as I might not get the chance to until I am back and by then it will be March! I have been truly blown away by how much people have become involved in this project and their excitement to go out and look for a heart.

all-you-need-is-love

Sometimes the most obvious song lyrics are the best.

But first, I’ll just start by explaining a little more about the project. What is this Share the Love Heart thing about?

Valentine’s Day isn’t always everyone’s cup of tea and it tends to have quite a romantic tone to it so I wanted to get away from that a little and expand the idea of love and kindness to anyone and everyone.

In a nutshell the idea has been to make a heart, however you like knitted/sewn/crocheted/paper-crafted/needle-felted/ceramic etc., attach a positive and uplifting message to it and then pass it on to a friend or leave it out in a public place for a stranger to find.

So far I have left a few on friends’ doors for them to find (this was really fun to do) or on railings by bus stops, benches, famous landmarks, cafes, and even a couple on our local supermarket’s shopping trolleys!

Door handles 3.jpg

A few hearts left of friends’ door handles. The top right was one I left in a changing room.

This idea isn’t new and I have seen such inspiring takes on this from all over the world. I have loved the idea of sharing a heart with a kind word attached so much that I wanted to instigate this kind of project here in this part of the world too. The #sharetheloveheart and #loveheartprojectiom hashtags have been for this project which has mostly taken place on the Isle of Man but I know of some who have put hearts around their local areas in the U.K. too as part of this project.

With all the negativity that is going on in the world and on the media right now what better time than to lift people’s spirits through a random act of kindness. The project’s aim has been to show people that happiness and hope can be found in the little things. Random acts of kindness are good for both the instigator and recipient of that act. Giving or receiving a compliment or a positive message makes us all feel good and can brighten anyone’s day. Kindness costs nothing and that’s what I wanted to get across with this project.

A bit like a yarn-bomb, leaving hearts in public places is also like free art, accessible to everyone. It is a non-permanent graffiti using yarn instead of spray cans and can be removed as easily and it was to put up. It often, but not always, has a political or artistic message surrounding it. For our ‘heart bomb’ it is a message of spreading kindness and compassion to friends and strangers and encouraging us all to have a little more hope in the future.

bunscoill

Bunscoill Gaelgagh, the Manx Language School in St. Johns

There is currently a Facebook event page called ‘Share the Love Heart Project‘ which you can find through my own Facebook page here, by typing it into the search bar, or clicking here. On this page we have all been posting inspiration, patterns for making hearts and pictures of where we been leaving or finding them. I will be sharing a collage of all the hearts made and found by others later this weekend and you’ll be able to see it on either my Facebook page or in the event page.

heart-peel-castle

This heart was pictured at Fenella Car Park with Peel Castle silhouetted in the background.

If you’d like to get involved it’s not too late as we’ll be carrying on until Sunday 19th, and hey if you still want to make hearts with kind messages and pass them onto friends and strangers after the 19th then go for it! Here’s what to do:

1. Make your heart(s): Crochet, knit, sew, paper-craft, make from clay, needle-felt, make however you want and however many hearts you want!

2.Write a message: Write an empowering and positive message, quote, or song lyric for your heart and attach it to your heart. Even something as simple as ‘have a nice day’ can have such a positive effect!

dont-let-the-muggles-get-you-down

A particularly favourite quote of mine from the Harry Potter series

Include the hashtag #sharetheloveheart or #loveheartprojectiom so that you and others can find them on social media.

3.Set your hearts ‘wild’: Start putting your hearts in your local community. If the weather is bad leave them in indoor public spaces like a cafe or library, or leave them on friends’/neighbours’/strangers’ doors.

Leave them wherever you are in the world and anywhere you think people will see them like park benches, iron railings, trees etc. (having a ball of string in your pocket might be handy to secure them or use the tail ends if you’ve knitted/crocheted them).

4. Share your hearts: Take pictures of your hearts or others that you spot and share, share, share with the hashtag #sharetheloveheart or #loveheartprojectiom

Take pictures, share them on social media, share any posts about it and enjoy!

peel-catherdral

On the bus stop railings with Peel Cathedral in the background

After the 19th February I ask that any hearts still up in exposed outdoor areas are taken home with you just to ensure they don’t pose a hazard to wildlife or be misconstrued as littering. This is a project to help spread compassion and kindness so please do keep making and giving hearts to people but be conscientious about the environment in doing so. Natural yarns are best as they biodegrade very quickly. Avoid exposed areas, sheltered and indoor areas are best. If you see a heart please do take it home with you or pass it to someone you think would value it most.

love-heart-project

Remember to include the hashtags #sharetheloveheart and #loveheartprojectiom so that I can see them all on social media!

Weather is never a yarn-bomber’s best friend so as the weather worsened mid-week I took a bowl of hearts to work with me and handed them out to customers over the shop counter. This way I knew that hearts weren’t being exposed to the bad weather but they were still going to happy homes.

free-hearts

A bowl of hearts given out to customers at Sweet Ginger Emporium in Ramsey.

This has been such an amazing project to be involved with and I would love to make it an annual thing on the Island. It’s also not quite over yet, and though I’m off on my holidays tomorrow I shall be going with a pocketful of hearts to pop about on my travels!

See you when I get back, folks!

Gráinne (rhymes with narnia) x

1st Blog Post of 2017: The Pussy Hat Project & #sharetheloveheart Plans

It’s a bit late to say “Happy New Year!” now but as this is my first post of 2017 I’ll just say “hello again”! *waves*

January has pretty much been a time to reflect, set goals (personal and business-y), plan, prepare and make for the year ahead, which is why there’s not been much to say on here yet until plans and goals start to come to life a bit more than their current form as notes in a journal and half finished projects.

If you follow me on Instagram, then you’ll have seen that not everything I’ve done has had to be kept under wraps for future months. There were times when some of the things I did this month were ‘picture worthy’. Mostly of cute commissions I’ve done and some learn-to-crochet workshop plans. (You can see more here.)

One of the things I was particularly proud of making and sharing was the pussyhat I knitted. The pattern didn’t necessarily take a long time to do or was nastily complicated in any way, but I was proud of it because I felt that in my own small way I was showing solidarity, support, and participation in the hugely inspiring Women’s Marches that I couldn’t physically take part in last weekend because, sadly, there wasn’t one on the Isle of Man (and I didn’t have enough time or funds to get myself to a UK one…).

16358684_10211475826432189_805434903_n

The ‘Pussyhat’ I made and shared on Instagram: @grainnelikenarnia

But despite that, it was truly an inspiring, emotionally uplifting and magical thing to see the immense turn out of people who all came together on that day. All united with the sames values of basic human equality, respect and kindness, and all wearing pink hats as diverse as the people wearing them! The project even made the most recent cover of TIME magazine! If you want to read more about The Pussy Hat Project you can on their website here.

pussyhat-project-image

Image courtesy of  Reuters – Shannon Stapleton via http://www.pussyhatproject.com

I admit though that as inspiring and empowering as it was to see the women’s marches all over my social media, I did feel really disappointed that I wasn’t physically a part of it all. They even had one in Edinburgh where I used to go to University, so I felt even more cheated that I couldn’t get more involved somehow. The idea of actually leaving your room/house to participate in something so positive really appealed to me, especially as it was for a cause I feel so passionate about. To anyone who knows me, I’m not a huge fan of crowds, so me saying this is quite significant! I have therefore resolved to try and get more involved with the things I feel passionate about, beyond sharing a poignant article about it on social media.

Which leads me nicely to the next thing I wanted to talk about. Valentine’s Day is coming up soon and though I’m not overly keen on some of the pressures it brings, (namely that it can sometimes make people feel that they must be in a relationship to feel worthwhile or valued), I did want to use the theme of love in a more inclusive and worthwhile way than in strictly romantic terms. I wanted to extend the love and compassion we see around Valentine’s Day to friends, family, and strangers as well.

So, in the spirit of the immense human compassion I saw all over my social media last weekend at the marches I wanted to try and keep up that idea of a community all working towards and participating in the same thing. Something I have also always wanted to do is to organise a yarn bomb. So why not combine the two and organise a Valentine’s week heart bomb?

A few inspiring heart bomb images from bloggers taking part in past heart bombs. Click their images to see their blogs.

A knitting and crochet blog I read a few years ago, One SheepishGirl (now One Social Girl) used to annually hold a heart bomb every Valentine’s week. A heart bomb is similar to a yarn bomb and if you don’t know what a either is it is essentially a form of non-permanent urban graffiti mostly knitted, crochet or other materials are used to convey a message or artistic statement. For a heart bomb, the theme would be more exclusively (yep you guessed it) hearts. Essentially everyone joining in would knit/crochet/sew/make small hearts, attach uplifting compliments to them, and leave them around local communities, with a hashtag so that they can be shared and seen on social media.

If you want to take a look at the original heart bomb post from that blog you can here, it also has a the pattern for these very easy 2D crochet hearts that I made last year (pictured below).

valentines-hearts

Little crochet hearts I made as part of the #sheepishheartbomb last year


Because I loved this idea so much I wanted to try and encourage my own heart bomb here on the Isle of Man with empowering messages attached, some perhaps in the Manx language (a brilliant idea thought of by some friends). I love it because no matter who you are, a positive message never goes amiss, a little kindness benefits everyone. When we are reminded to feel positive about ourselves or each other, the more positive thought and action we experience for the future.

high-definition-rainbow-hearts

Amigurumi rainbow hearts pictured by me for a workshop on the 11th February

If you want to get involved with this, either here on the Isle of Man with me or in your own communities, then here is what we’re going to do.

  1. Make your heart(s): Crochet, knit, sew, make however many hearts you want.
  2. Write a message: Write an empowering and positive message, quote, or song lyric for your heart and attach it to your heart. Include the hashtag #sharetheloveheart so that everyone knows where they can find them on social media. If you’re from the Isle of Man you might want to also use the hashtag #loveheartprojectiom
  3. Set your hearts ‘wild’: Start putting your hearts about your local community. Anywhere you think people will see them like park benches, iron railings, trees etc. (having a ball of string in your pocket might be handy to secure them).
  4. Share your hearts: Take pictures if you can of your hearts or others that you spot and share, share, share with the hashtag #sharetheloveheart or #lovelheartprojectiom

The heart bomb will take place over Valentine’s week so you can begin setting them loose from the 12th February until the 19th. Take pictures, share them on social media, share any posts about it and enjoy!

I will be making a facebook page for this as well as a platform to share inspiration, patterns and pictures of all our hearts, so look out for that over this weekend! I can’t wait to see your hearts!

Peace and love to you all & happy Friday!

Gráinne ❤

December ‘Kitschmas’ Wreath: DIY!

finished-wreath

finished-wreath-2Hello! Hello!

Yes… it’s been an awfully long while, and yes it’s only 4 days until Christmas, but here I am just in the nick of time to see Christmas in with a lovely and quick little DIY for you! 

I am quite obsessed with all things ‘kitschmas’, as too am I obsessed with all things miniature, Christmassy, alpine-y, pom pom-y, and starry, so this DIY has genuinely ticked A LOT of boxes for me. You can make this one pictured above or go off-piste and create your own version. (Ooh I’d love to make a ski-inspired one now…) There really are no limits! So pop on the Christmas tunes, have a few mince pies to hand and enjoy! X

 blog-post-teaser

You will need:

Wire wreath – I got mine from Sweet Ginger Emporium on the Isle of Man but they can be found quite easily from craft shops and florists. 

Polyester wadding in one long strip or several small strips measuring approximately as wide as your hand (as you can tell it is a very exact science here at Yarny Gráinne HQ…)

One safety pin – sewing is also an option here if you are less lazy than I. 

Glue gun – this is optional but recommended if you don’t have a lot of time to sew. If you love hand sewing and have ample time, go ahead!

Gold thread – to sew the stars (glue gun would have made too much of a mess here).

Pom pom makers – use any method you like to make the poms but I think the little contraptions pictured in the post are absolutely magic!

A selection of yarns in off-white to cover your wreath and make pom poms – the more variety in texture and weight the better. I have gone for Drops yarns in Eskimo, Alpaca Boucle, Karisma and Air. 

Scissors and sewing needles.

Small and kitsch little wintry figurines. These chaps that are featured in my post were all found at a sugar craft shop as cake toppers.

Wintry bits and bobs to add – wooden snowflakes, bells, sequin stars, buttons, etc. etc. whatever takes your fancy!

pom-pom-3

Pom Pom makers by Clover. They may look a bit confusing but once you know how to use them they are a super speedy way of making pom poms!

yarns

Yarns for the pom poms! Pictured here: Drops Karisma (left), Drops Alpaca Boucle (bottom right), Drops Air (top right)

Let’s get started! Cover your wire wreath with the strip(s) of polyester wadding by wrapping it around.

wire-wreath-3

Once fully covered secure with a safety pin at the back (this will get covered up by yarn layer). If you prefer to sew it in place you can do instead.

wire-wreath-safety-pin

Next, begin to wrap your yarn around the wire making sure to cover up the polyester layer beneath. I have used Drops Eskimo which is a chunky weight yarn which seems to work quite well. Note: the thicker your yarn the more surface area it will cover and the quicker you can cover your wreath. 

yarn-on-wreath

Using a darning needle, sew in your end to secure the yarn layer.

sew-up-wreath

Next make your pom poms! Make as many as you like but for my wreath I have made 7 in total: 3 big ones, 4 smaller ones.

pom-pom

A useful tip: use small and sharp scissors to cut the pom pom

pom-pom-5

Now that you have all your yarny bits made, it’s time to attach the pom poms to the wreath!

wreath-covered-2

I pinned my pom poms to the wreath first just to make sure I had them in the right place before taking the glue gun to them. Again you can sew your poms if you prefer.

When gluing make sure you press each pom pom onto the wreath for a little while until the glue has completely dried. If you’re making this with children, adult supervision is most definitely advised.

wreath-pins

Now for the fun part! Once all your pom poms are attached and secured you have your blank canvas to play around with ideas! 

wreath-with-pom-poms

Here are a few of the ideas I was playing around with before settling on the final one.

wreath-ideas-1

I loved this idea a lot actually so think I shall have to make another wreath!

wreath-idea-4

However this is the one I finally settled on. Doesn’t he just look so peachy in there?

wreath-with-bits

Finally all that’s left to do is attach the bits and bobs! I used the glue gun to attach the wooden snowflake and figurines. I used gold thread to quickly sew on the stars. I advise pinning the stars on as you may need to pick up the wreath whilst sewing each one and you don’t want them to keep falling off.

pinning-and-sewing-stars

And there you have it! Sit back and admire your masterpiece! Use a ribbon, a hook or pin to attach it wherever you like! 

finished-wreath

How did you get on? I’d love to see your finished makes! Use the hashtag #yarnygrainnediy on instagram so I can see all your wonderful Kitschmas wreaths! 

I wish you all a very yarny little Christmas! x

Moots vs. Pumpkins: An Ode to a Turnip

14795906_10210513731500417_1602306145_o

The 31st October approaches, and it is at this time of year that the Isle of Man tends to fall into two camps: Are you team pumpkin or team turnip?

In the Isle of Man we celebrate Hop Tu Naa. Without going into a full blown out explanation, it is, in a nutshell, old Celtic New Year. It marks the changing of the seasons from Autumn into Winter. In the tradition of Hop Tu Naa we carve turnips into lanterns (known as moots to any Manxie worth their salt) because that is what grows here.

Hop Tu Naa garland

Little moots (as turnips are known here on the Isle of Man) ready to be strung up into a garland.

Though there are a lot of similarities with modern Halloween, (like how we also dress up to scare away the evil spirits), there are important differences too which is why it shouldn’t be mistaken for the ‘Manx version of Halloween’ or become so easily merged into obscurity with wider Halloween celebrations. Key differences include singing the huge variety of Hop Tu Naa songs sung all over the island depending on where you’re from; or dancing the Hop Tu Naa dance at a Celi instead of Trick or Treating for the biggest haul of sweets you can get your hands on. For myself, I feel that it is more wholesome to take on the labourious task of carving a turnip and to sing and dance to Hop Tu Naa songs. It is also important in that it helps to promote and keep alive Manx culture. Something that should definitely be cherished and celebrated.

However, since globalisation and Americanisation it’s not hard to see how or why the pumpkin has grown in popularity and availability. It is aesthetically appealing in its vibrant orange colours, perfectly smooth and round in shape, delicious to bake and cook with, and, it is also way easier to carve.

Why bother with the turnip then? The moot in comparison is thoroughly more difficult to carve (I advise drills…), not so pretty to look at, definitely not perfectly spherical, and turnip pie? …perhaps not. But, despite the perhaps more obvious appeal of pumpkins and Halloween, I feel the humble moot needs its champions here on the Isle of Man. Sure, it’s ugly, but that’s what we love about them! They come in a whole spectrum of greens, yellows and deep purples. It’s lumps and bumps are what gives it character (sometimes literally). The years spent carving facial features based purely around it’s bumps and lumps is what gave it charm. Plus, there is nothing like the smell of freshly burning turnip. Once the tealights are lit and placed carefully inside the finished lantern that took you several hours to complete, you can breathe in a great sigh of turnip-y relief. It is the smell of victory! So this is why I say to you that we need to keep this tradition of turnip lanterns and Hop Tu Naa alive and distinct, celebrating them in their own right and recognising their meaning as a turnip-y beacon of Manx culture in the modern day.

Hop Tu Naa garland 1

That being said, there is a lot of enthusiasm for keeping Hop Tu Naa traditions alive if you know where to find it. But because of the similarities of dressing up and carving vegetable lanterns, it is in danger of becoming swallowed by the American image of modern Halloween. I am not against Halloween in any way, nor am I against the tide of modernity but I do feel strongly that Hop Tu Naa should be valued in it’s own right alongside Halloween rather than to be seen only as a quaint extension of it or the Manx version of it.

So that’s why this year I will be carrying on my tradition of carving a turnip, (with a drill if necessary!) because it just wouldn’t be the same without the smell of burnt turnip in the cold October air.

Whatever you are carving this weekend, spare a thought to the humble turnip and what it represents to the Manx people in all it’s gnarly and deformed glory.

Love, Gráinne x

(Rhymes with Narnia)

Crochet Leaf Tutorial

14803087_10210486917790091_1268593986_o (1)

Hello, hope you’ve all been having a lovely weekend?

Here is a lovely and quick little tutorial I’d like to share with you for making these wee Autumnal leaves. I made ones of this shape and size to add a bit of contrast to the larger sycamore leaves that featured in my Autumn Wreath post (which you can see here). They would also make such a sweet garland, and can be made in any colour scheme of your choosing.

A note to international crocheters. I have used UK terminology throughout so it may be worth keeping a conversion chart handy.

Each leaf measures approximately 7-8cm when made in cotton with 3.5mm hook but will vary depending on whether you use a larger or smaller hook.

You will need

You can use up any of your small amounts of yarn with a corresponding hook size.
I have used 100% cotton yarn with a 3.5mm hook.
Scissors
Darning needle to sew in ends
Blocking optional

Abbreviations

MR -Magic Ring
Sl St- Slip Stitch
Ch -Chain
Dc- Double Crochet
Htr- Half Treble
Tr- Treble
Dtr- Double Treble
Picot- Chain 3, slip stitch in first chain to create point

Pattern

Note: All instructions contained within brackets are all made into the same stitch

Setting up: MR, ch3, 10dc into ring, sl st join

Leaf shaping: (ch1, dc), (dc, htr), (htr, tr), (2tr), (tr, dtr), (2dtr, picot, 2dtr), (dtr, tr), (2tr), (tr, htr), (htr, dc), dc in next stitch, sl st into next stitch

Stalk: Ch7, sl st in 2nd ch from hook and then into each remaining ch, sl st into base of leaf.

Fasten off and sew in ends.

Below are some progress pictures to help you along. If you have any questions at all about understanding this pattern please don’t hesitate to leave me a comment or send me a message on my facebook page by searching ‘Yarny Grainney’.

Enjoy and happy leaf making!

Love, Grainney x

(Rhymes with Narnia)


Autumn Wreath

Autumn Wreath

So I’ve finally finally made an Autumnal wreath. Yay! It’s something which appears on my to-do list every single year around the end of summer/beginning of Autumn and I just never get around to it (especially as the pressure to make for that Mid-Winter festival we all know and love starts to creep in). It’s sounds silly to say but being half-way through October I should really be well on my way with making my Winter collection for fairs but the truth is that I just can’t help but cling onto Autumnal things well into October and occupy myself with October/Autumnal/Hop-Tu-Naa inspired projects. This might be the reason why I can never get everything done, hmm…

I took a lot of inspiration for my wreath from a Harvest Festival garland/wreath project I saw in Simply Crochet issue 49. I used the sycamore leaf and pinecone patterns from the project but the smaller leaves and acorns are my own. My wreath is also a lot smaller in size and I’ve used my own arrangement and colour choices for it. I used a wire wreath from Sweet Ginger Emporium in Ramsey, IOM, and wrapped polyester wadding around it to create a nice padded bit that I could pin and sew the leaves onto. Those cute wee toadstools are from Sweet Ginger too, I thought they added a nice pop to it. The stag and bird ornaments are my own and are not attached to the final piece but I thought they looked so peachy in there whilst I was photographing it!

14647462_10210378697284646_1464373887_o14646582_10210378696924637_1945492055_o14724015_10210378704924837_2036293003_o14689306_10210378697124642_1584371265_o

I made this wreath partly to show what you can do with small 2D and 3D makes other than just garlands. I have made a lot of garlands in my time and there are only so many you can hang up or try to push onto others. I thought this was a nice alternative. I’m excited to try making some Winter-inspired ones in time for my next fair in November!

Have you made any autumnal wreaths? I’d love to know if anyone does it other than just at Christmas?

Hope you’re all having a lovely Friday!

Love, Gráinne

(rhymes with Narnia) x

Phases of the Moon Garland

Moon garland 3

It’s October and my crochet to do list is ever growing! But, despite all that, this is something that I’ve been wanting to create for quite some time. I’m pretty obsessed with the moon & stars and since the nights have been getting darker it seemed very fitting to get it made. Around this time last year I got up at 3am, to watch the eclipse (madness I know!) but despite the sheer horrendousness of waking up not long after getting into a deep deep sleep, I found it so magical and was really glad I went. We are really lucky on the Isle of Man when it comes to star gazing (and moon gazing), there are very few areas that are so light polluted that you can’t get a clear view. In fact, I’m very proud to say that we have been named one of the best Dark Skies areas in Britain. We have a lot of countryside so it’s really easy to see the night sky very clearly and we often see the Milky Way right above our house on a cloudless night.

Moon Garland 5

Aside from all the physical inspiration behind the garland, it’s also soon approaching Hop Tu Naa (for those who aren’t familiar with this I explained more about what it is in my previous post here). And my party theme this year is going to be all things Pagan. It means different things to different people but my interpretation of it is going to be very celestial. This garland is so far the first thing I’ve made for the party and won’t be the last (including my costume)! I went slightly mad pinning away potential party decoration ideas so on top my massive to-do list I’ll be trying to tick off as many things from that board as possible. Wish me luck! And look out for party posts later in the month.

What are you making this October? I’d love to know! Happy Monday, folks!

Love, Grainney

(rhymes with Narnia) x


Hello!

Grainney's business card photo.jpg

Welcome!

This is my first blog and first ever post! With it, I plan to share and enthuse about all things knitting, crochet, and lots of other things that inspire and make me happy.

So let me begin by telling you a little about my yarny background…

I first began to knit as a child, as most of us do, by our grandmothers’ side, knitting a very wiggly, holey, but well-intentioned, square.. after that I never really stuck with it throughout my teenage years other than the occasional contribution to a family blanket made of lots of squares. My mum and older sister’s squares were, by contrast, very neat, even and came in lots of different variations of knitting, purling, ribbing and cabling, whereas mine didn’t progress much beyond simple knitting and the occasional purling.. Suffice to say I wasn’t very inspired by knitting and couldn’t see it’s potential beyond the limits of a simple square.

That was until I went to university where I decided at the Fresher’s Fair that I’d give it another try… Intrigued by a student sat knitting something with the biggest needles and biggest ball of yarn I’d ever seen, I signed up to Edinburgh University’s Knitting Society. And so after the first session at a local pub with like-minded individuals and a bowl of chips, the basic knit and purl stitches came back to me quite naturally and so I was feeling quite pleased with myself. However, it took a little while longer to overcome the frustrations of how to correct my mistakes whenever I dropped a stitch or did something entirely unexplainable to my project, having to wait until the next Monday session to get my lovely, and very capable friend, to help me out every time it happened, which made progress on my chunky knit scarf very slow… and very boring…

Eventually, after a few skype knitting-sessions with my mum and after slowly understanding how my friend was correcting the mistakes I’d made, I began to learn how to get out of these yarn-related pickles myself. I soon grew so bored of the scarf-that-was-taking-far-longer-than-it-should-have and moved to something new. I decided to give a small heart decoration a go. I was so pleased with myself for making something without any help from my mum or my friend that for the first time I felt that this was something that I could do. After that, I think every new uni friend got a heart decoration for their birthday that year whether they wanted one or not, I felt unstoppable…

I’ve come quite a long way since then but I am definitely no expert and am always keen to learn more about knitting. The following summer after first year I was taught to crochet by one of my mum’s friends and instantly fell in love with it! It just GREW so much quicker than knitting and the possibilities with it seemed endless and, more importantly, far more achievable than some knitted things…

By fourth year I was President of the knitting society and thoroughly enjoyed teaching new members the knitting and crochet basics and seeing them grow in confidence with it like I had. As well as the beginners, the society was a place where the more advanced knitters and crocheters could come together once a week to talk and show off our latest projects. My experience with the society, and the sheer wealth of knitting and crochet blogs, magazines and pinterest posts out there in the world, has taught me that there is a such a huge interest and engagement with making things by hand nowadays that it is not to be underestimated or sniffed at. It’s a really wonderful thing to be a part of.

Since graduating last summer, it’s been my intention to start a blog to become a part of the vast online community of knitters, crocheters, and all the other fantastic creatives out there, who inspire us to create. Having a creative outlet throughout uni has been very important to me especially as times got tough. Whether it was homesickness, essay or exam stress, knitting and crochet helped me hugely and gave me a strong sense of satisfaction and pride when I completed a project. It helped me to unwind and provided a welcome distraction to all the overrated worries of student life.

Who knew that a humble ball of yarn with a pair of needles or a hook could be such a life-changer!